


In the previous lesson I explained how to find particular rows from one or more tables. In this lesson we’ll go into the creation of new rows, updating existing rows and removing rows.
State of row buffer
Important to be aware of is the state of the row buffer. The state of the row buffer can be one of the following four:
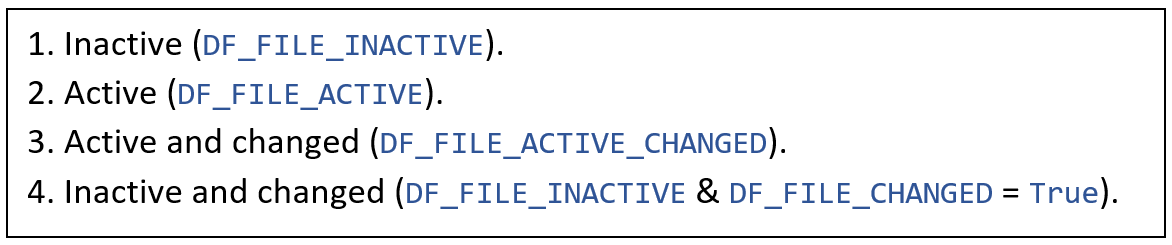
First, inactive. The state of a row buffer can be made inactive using the Clear data dictionary message. This clears the local and global buffer. Second, it is active after a successful Data Dictionary Find. And the state of the row buffer is changed when a value has been moved to either an active or inactive local DDO buffer.
Create row
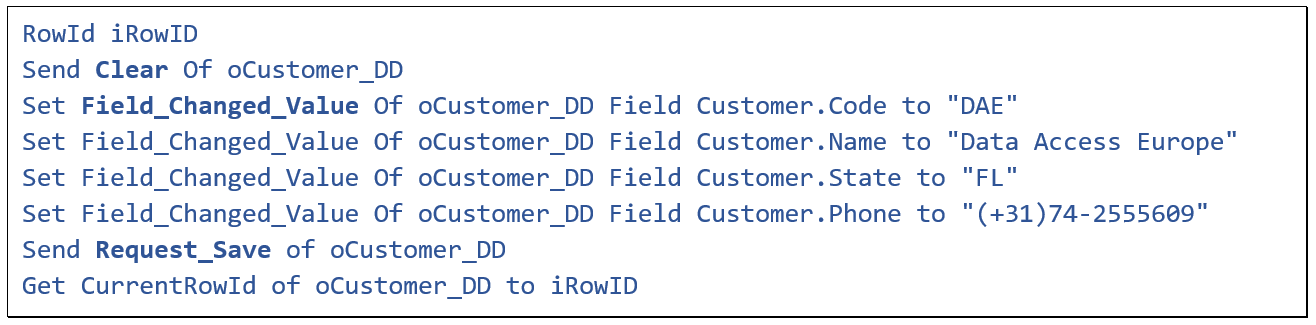 A new row can be created if the state of the row buffer is inactive and changed. In other words, you send a clear, then change values using the Set Field_Changed_Value instruction, and then save the record through the DD by sending Request_Save. See this code example.
After a clear, four columns of data are set and then Request_Save is done, which under the hood takes care of the saving logic. After a successful save, the global buffer will be the same as the local DDO buffer, except for the RowId, which was empty before saving the new row and it got a value upon the save.
In case when there is a parent DDO involved, the framework will move the value of a related-to column into the foreign key column during a save operation, to keep the relationship up-to-date. In other words, Data Dictionaries automatically copy the information from the table that receives the save request to its parent table.
Transactions
The Send Request_Save instruction causes a transaction to be started at the lower level.
Transaction: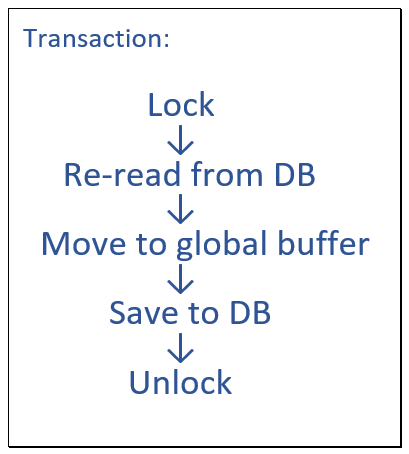 A transaction technically locks all open tables that are part of the current create, update or delete process and that are not read-only and are not an alias table. At a lower level, locking of tables is done by executing a Lock command, which has no arguments.
The current row will be re-read from the database for all tables that are part of the transaction. This way a save cannot overwrite the data earlier saved by another user or process.
After that, the values of the changed columns in the DDO's local buffer will be moved into the global buffer and the real save takes place by a Save or Saverecord command.
Finally, the transaction will be ended resulting in a commit of the row changes. And the unlock command is executed to release the lock. Any errors that occur during the transaction abort the process and roll back any already made changes. The global buffer will be restored to what it was before the transaction.
Updating a row
OK, I just explained the creation of a new row. Updating an existing row is not much different, except that first a record needs to be found.
After a successful find, the row data will be loaded in the global buffer. If the find was performed via a Data Dictionary, which is a good idea of course, the data is also copied to the local buffer. The state of the row buffer is then active. And it changes to active and changed if a value is moved into the active row buffer by setting the column value via the Data Dictionary, as in this example.

You can do this with Field_Changed_Value, which I already mentioned. But as is shown in the next example, you could also do that via the File_Field_Entry procedure.
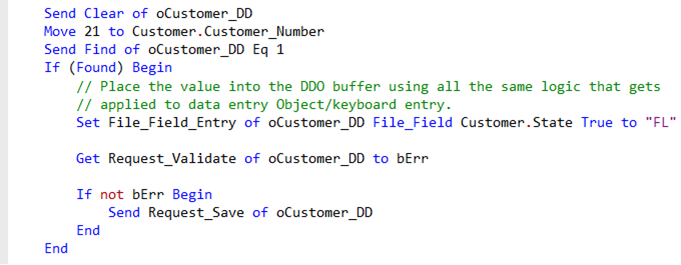
Then you simulate as if the user has entered the value via the Data Entry Object, including any logic that comes with that.
At any time you can check whether a column of the DDO buffer is still the same as when the record was retrieved, or whether it has changed, by getting the Field_Changed_State, as shown here. Under the hood, this flag also determines whether the column participates in a save operation.
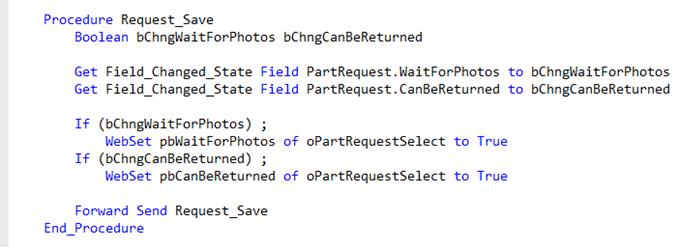
In this example the Request_Save procedure is augmented to first inspect whether two columns have been changed before doing the save. Depending on their Field_Changed_State, it does something additional.
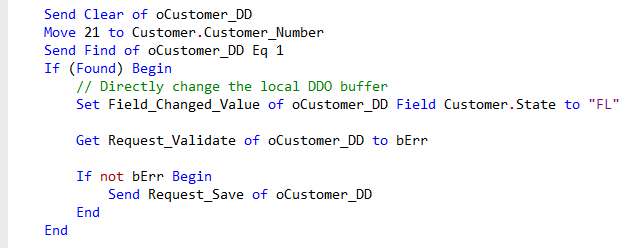
Let’s go back to the code example I just showed before. As you can see, it does a Request_Validate before doing the Request_Save. Although it is not strictly required to do so, it is highly recommended to always do a Request_Validate first. This sends validation messages to all DDO fields in all tables that will participate in the upcoming save, without locking any table. Request_Save will do a final validation, but at that point the table is locked.
If you are performing saves manually within a Batch Process or a Web Object, you will need to send Request_Validate yourself. In other cases, for example when using a Web Browser object's high level save, such as in a mobile zoom webview, this message is sent for you. If the validation of any field fails, it returns a non-zero value. An error message will usually be generated when a field validation fails. And the save will not proceed: In this code, the Request_Save is not done. And if there are Data Entry Objects attached to the DDO, it will attempt to give the focus to the DEO that contains the invalid field data.
There is also a Request_Validate_All, which may be handy in batch processing, where you may wish to list all field validation errors.

It is similar to Request_Validate, except that validation will continue after a validation error has occurred. But it will still return a nonzero value when one or more validation errors have occurred.
Request_Save
After Request_Validate, you Send Request_Save to save any changes. Be aware that a save always propagates up. So, if a foreign key value is changed, then that change is also made in the parent table.
It is good to be aware of all the things that Request_Save actually does.
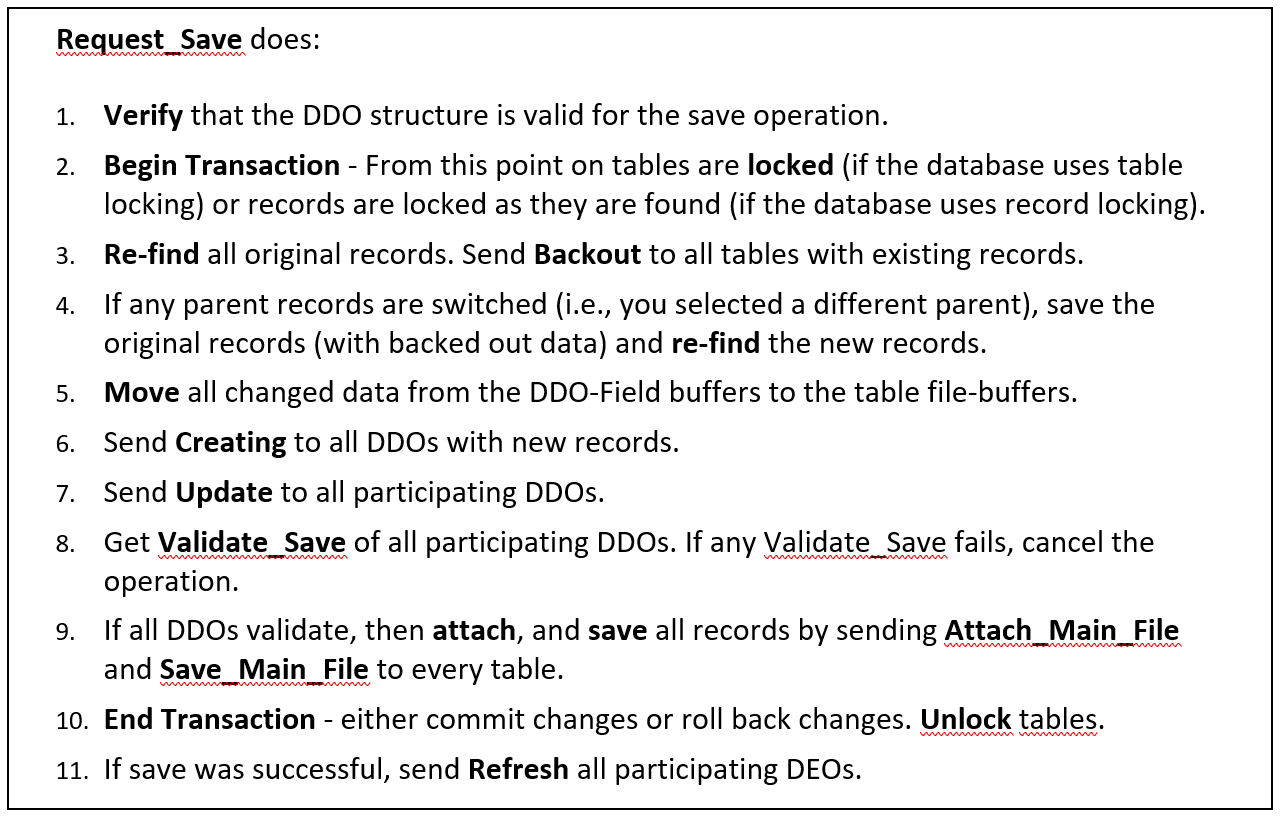
First it verifies that the DDO structure is valid for the save operation. If so, the transaction is started and tables are locked, as I already mentioned. It does a re-find of the original records to merge in last-minute changes that might have been done. In step 5 it actually moves the changed data into the global file buffers, after which it sends Creating and Update messages.
Next, in step 8, it does a Validate_Save of all participating DDOs. At this point the data in the global file buffer is exactly what would get saved. Note that Validate_Save is not the same as Request_Validate. Validate_Save is not meant for validating a name or so, but could be used for example for validating whether there is enough stock left when booking an order. Validate_Save has been discussed in lesson 6.
Then each DDO will do an attach and a save by calling the Attach_Main_File and Save_Main_File routines. Finally, the transaction is ended and tables are unlocked. All DEOs are refreshed and will contain the values that are currently in the database.
Updating multiple rows
Okay, let’s go back to updating records.
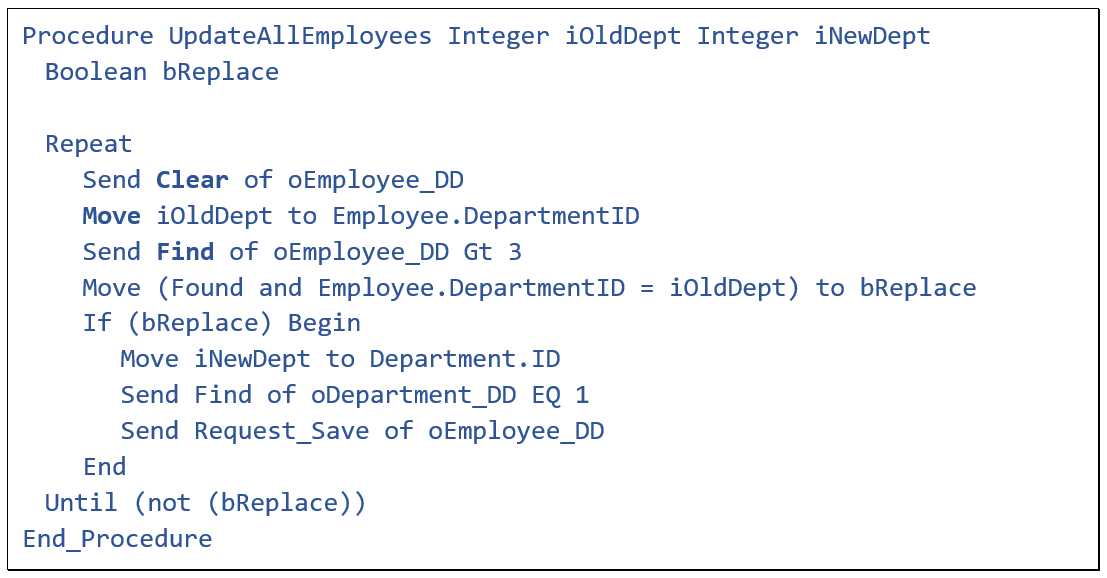
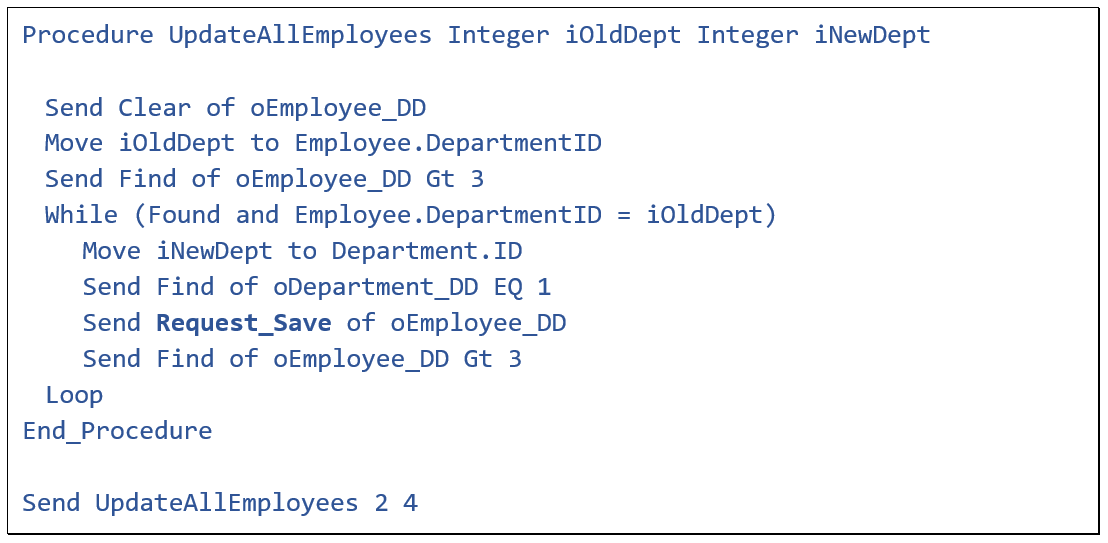 Here is a procedure that updates multiple rows in a loop. The idea is to update all employees of a particular department to go to another department. But something’s wrong.
Let’s have a look. Before the loop, it seeds the Employee table with the old department, number 2, to find an employee record. If it is found and it is that department, then it updates the record to the new department, number 4, using Request_Save.
Then it tries to find the next employee. But it does that based upon the current global buffer as the seed. But we just changed the department to number 4, which is what is now being seeded. So the find will find an employee of the new department, the while condition will not be met, so it gets out of the loop. Only 1 record has been updated.
To correct this, we must seed the global buffer with the old department before each Find.
This code will do that correctly. Each cycle there is a clear and a seed with the old department first before doing a new find of an employee.
Deleting rows
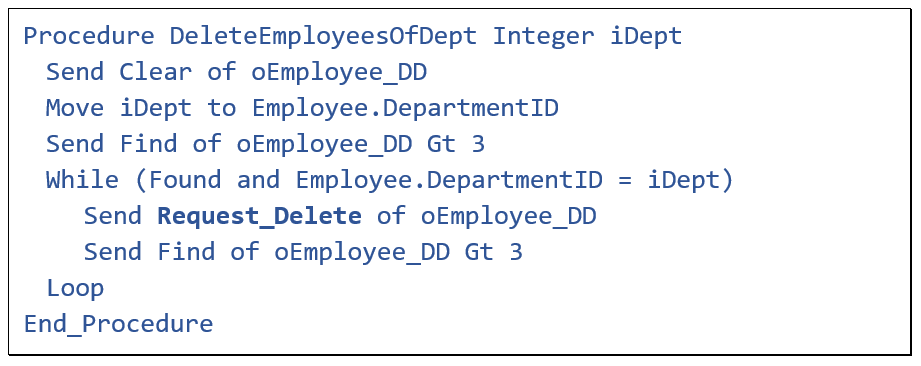 This example shows the deletion of all employees of a particular department. At a lower level it executes the Delete command.
Deletions propagate down, which means that child DDOs will delete the relating rows too. Now, if you don’t want that for a particular table in a particular webview, then you could set the No_Delete_State property to True.
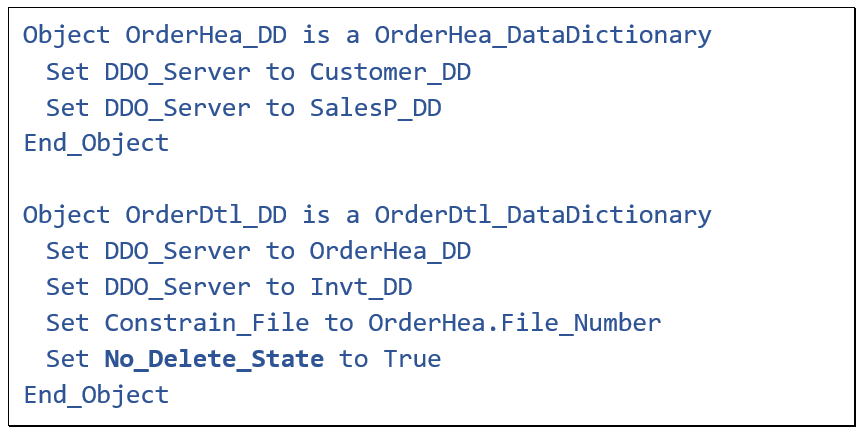 In this example, when a Request_Delete is sent to OrderHeader, the order header row gets deleted but the order detail lines are not deleted. And if the Request_Delete is sent to the OrderDetail_DD, nothing gets deleted. You should use the property with care as it is possible to create database inconsistency.
Read-Only via the DD
You could also make a table read-only via the Data Dictionary, using the property Read_Only_state. It is more likely to be set in a Data Dictionary object (DDO) and not a DD class.
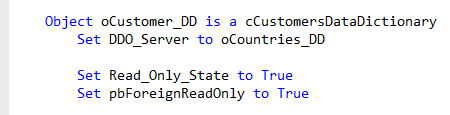
It specifies that the Data Dictionary cannot be directly used to save or delete records. This means that the messages Request_Save and Request_Delete sent to this DDO will generate an error and not perform an update.
But beware that it only works for the DDO that receives the original save request. If the save propagates up to a parent data dictionary and the Read_Only_State of that data dictionary is set to true, it is ignored there. This is needed to enforce data integrity.
If the parent table has to be read-only, you can set the property pbForeignReadOnly. This can be particularly useful with alias tables, which are most often used as parents. When pbForeignReadOnly is set to true, you are telling the system that this table never changes when it is used as a foreign - or parent - table. If such a change would occur during a foreign save or delete, an error will be raised and the entire transaction will be rolled back. However, if that happens at runtime, this is most likely a programming error. Because you've told the Data Dictionary it will not change, but it has!
Okay, that’s it for this lesson. In the next lesson I am going to talk about filtering of data.
