


In the previous lesson we saw how to set appearance parameters in the Data Dictionary. In this lesson, we’re going to discuss the Data Entry Options, sometimes called Field Options. These are settings that tell DataFlex what to do when the user enters data. They determine a variety of attributes including finding, data entry and update behavior.
As a reminder, the Data Entry Object, such as a cWebForm or a cWebCheckBox, must have the Entry_Item property set to the database field, like in this code snippet, and the DDO, the Data Dictionary Object, must be defined.

Field_Option
Almost all the Data Entry Options are coded in the Data Dictionary class as Field_Option property settings. The general syntax is like this:

You can see the code by pressing F7 when you’re in the Data Dictionary modeler.
Each of the Field_Option code lines can be added either to the Data Dictionary class or to the Data Dictionary Object. Here is the full list of Data Entry Options. Each one can either be set to true or false.

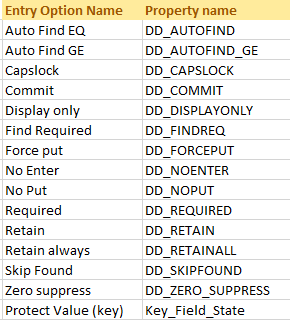
A bold value indicates a change from the initial setting. Choosing "Reset value" from the floating menu resets the value back to the Data Dictionary class defaults. From the floating menu you can also quickly browse through the columns to set a particular option for multiple columns. Now let me walk you through all these options in the order shown here, to tell you what they mean.
Auto Find EQ
The first one is Auto Find EQ. Set this to True if the framework should try to find a record in the table based on the entered value at the moment that the user tabs out of the Data Entry Object, the DEO. So the user would not have to click the find record button or press F9 . This option will not work on a field that does not have a main index, but you would usually set this option on every key field in your database. It then works as follows: If the record already exists, it will be loaded and the user cannot edit it. When the record does not exist the user can enter the rest of the information. This way, the user does not get a “duplicate records are not allowed” error when saving with an existing key.
One important note on this entry option: it does not work in a drill-down style web application, it is not used in that case.
Auto Find GE
Next option is Auto Find GE. When switched on, and when the column is indexed, it will try to find a record when the user tabs out of the DEO, where the value for this column is greater or equal to the entered value. But if no record matches – it gets past the end of the table – then the last record will be found. So it will always find a record unless the table has no records in it. This option is not often used for the main table, by the way.
Capslock
The Capslock option will format the DEO to convert all entered lowercase characters to their uppercase counterparts. Only newly entered values will be uppercased, existing data is unchanged.
Commit
The Commit option tells the Data Dictionary that the user can never change this value anymore once the record is committed. You could use this, for example, for an order date that can be entered during the order intake process but cannot be changed after that anymore. In lesson 10 we go deeper into the committing of data.
Display Only
Next is the Display Only option. Setting this to True blocks user entry, and even if program code sets the value the save will ignore it too. This option is actually a combination of two other options, NoEnter and NoPut, which I’ll discuss in a moment. Therefore, when doing data import using DDOs, it is better to not use the Display Only option, and only set the NoEnter option, to prevent that the import fails.
Find required
Next, the Find Required option requires that a successful find must be performed before the user can leave the control that is assigned to this column. If you would turn this option on for the keyfield, it would not be possible to ever enter a new row. The option is mainly used for parent table usage and rarely used as normal data entry option. And when used for parent table use, you should set Foreign_Field_Option instead of Field_Option. Which means: Apply this option when it is used as parent table.

Force Put
The Force Put option, when set to True, forces the displayed value to be saved to disk upon saving the record, even when the value has not been changed. This potentially overwrites a value that someone else has changed in the meantime. This is actually not the normal way that DataFlex works: normally it would only store columns that have been changed, others are untouched in the database. So, the changed values are normally merged into the existing record, so that changes made by others in the meantime in other columns are preserved. But as I said, the Force Put option changes this for the columns where you switch it on.
No Enter
Then, the No Enter option. This option disables controls for this column. So users can not move the focus to the control and therefore cannot change the value. In most cases it is better to use this option than the Display Only option that I already told you about. By the way, data can still be moved to the form under program control. Such data changes will be moved to the record buffer and saved, which is not the case with the Display-Only or No-Put options.
No Put
The No Put option lets the user enter or change values but the changes are never stored in the database. No-Put is useful for allowing data to be entered into a form for finding, where you do not wish to allow the field to be changed. But be sure to use it with care: Turning it on can cause data import to fail because the scope is not limited just to entering values but for every value put in the buffer by any means.
Required
Next, the Required option. With this option turned on, the user cannot leave the control or save the row when the column has no value. So, the required validation is always applied during a save even when the control is not visible. A zero in a numeric column is seen as no value.
Retain
Retain and Retain always are actually deprecated options since the DataFlex version from 2012. The retain option causes the column to keep the last given value after a clear request is made. It is better to use the newer DD_Remember option, which is not in this list of options. But hey, since I am on this subject, let me tell you about it.
DD Remember
DD Remember allows you or your user to dynamically assign and remember a specific value, which can be handy for mass data entry screens. When you clear a view, this remembered value is used as the new default. You can also choose to remember the last value entered. When you clear a view, the value currently in the DEO will be used as the new default.
This can be assigned at the DD or at the DEO level. Even better, this can be set directly by your end users. Menu items can be added to your menus, context menus and tool bars to do this. This empowers your users and makes data entry faster and more flexible. No programming is required to support this. Let me show this.
Video example:
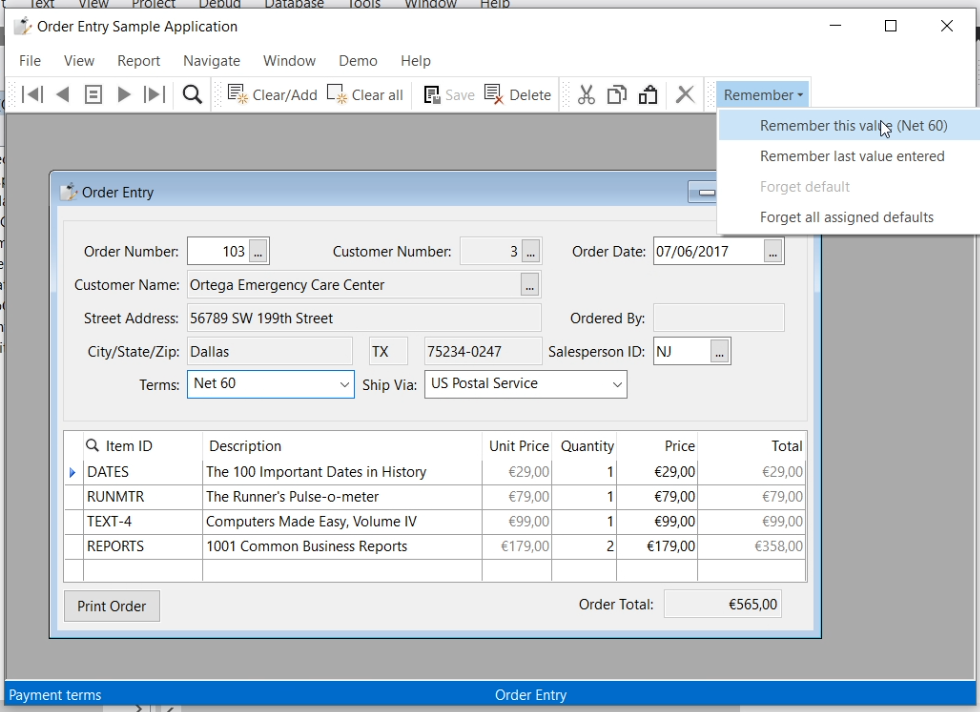
Here is the Order Entry example application. I run it. In the menu we find a Remember menu option.

Let me find a record (103) and suppose that I want to create a record that should get some of the same values as we already have here. I click on the fields and click to remember them.
Then I do a Clear and you can see that the values are still there.
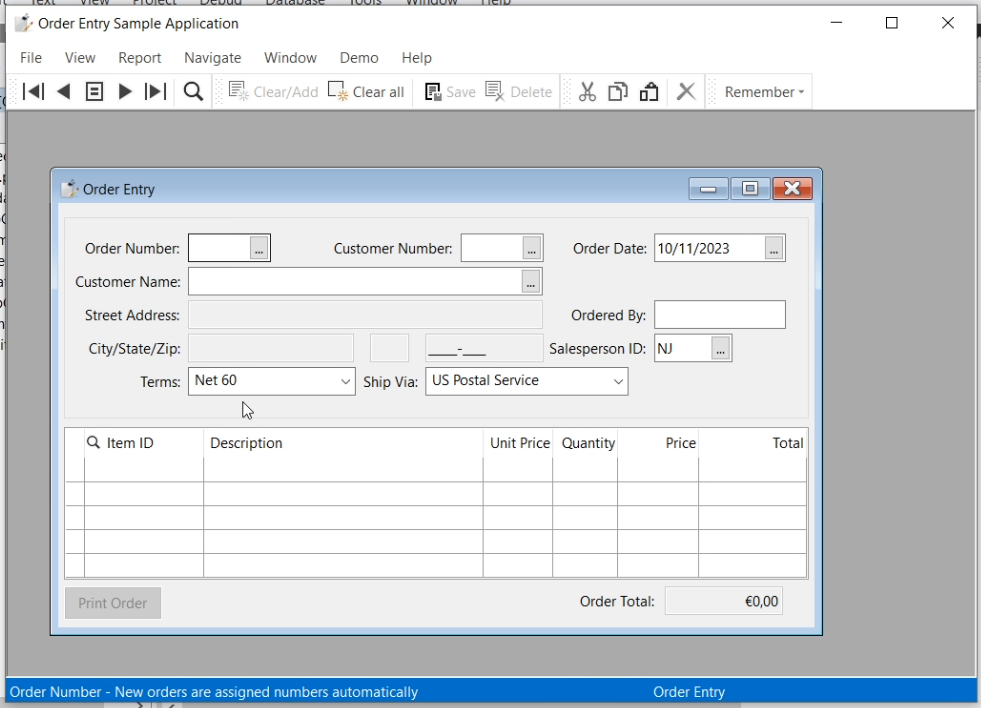
Now I select a customer and save the record. It automatically created a new Order Number. I can do this again and again to quickly create more records with those fields with the same Terms, Shipping and SalesPersonID. And finally I can click here to forget the values.

Now, the code behind this is really simple (Order.src). It is just a menu item with these cCJRememberFieldMenuItems set. They work application wide.
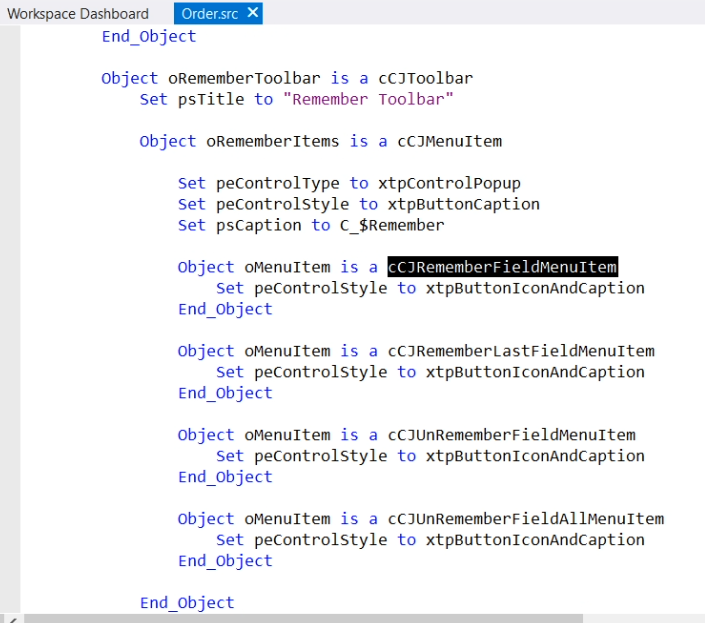
Under water, these set the Field_RememberedValue setting of the present Data Dictionary table.
By the way, not all views are suitable for using this option. In a drill-down web application it would not work, for example.
Skip Found
Back to the list of Data Entry Options, next is Skip Found, which stands for "Skip When Found". This option is actually deprecated since the introduction of the commit option, which is preferred.
Zero Suppress
The Zero Suppress option tells the system to suppress showing a zero if the column contains a zero.

When a lot of zero values are expected and a quick discovery of the non-zero values is desired, this option is useful. The following picture shows the difference for a view when Zero Suppress is not enabled and when it is. These are Windows views by the way. In web it looks slightly different.
Zero suppress is not enabled:
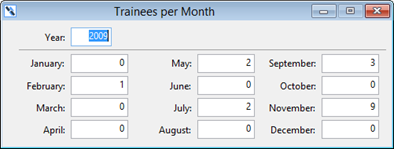
Zero suppress is switched on:

Protect Value (key)
Finally, the Protect Value (key) option. This option tells the system that the value of this column is a key to uniquely find a row in this table. If your primary Key consists of multiple column segments, all columns in the key should be marked as Key columns. The code for this option is a bit different, which is why I show it now. The property is actually called Key_Field_State.

Key columns are only protected in a table if Protect_Key_State is set to True. This combination of settings prevents the user from changing the value after it is initially put into the row. Since a change in a key does not cascade down to related child rows, allowing a change in the key would make all related child records orphans. So, it is very important that this option is set for all columns that are used as target for a foreign key.
These are all the Data Entry Options that are configurable from the DD modeler. For more detailed information on the Data Entry Options, you can look into the help on Field Options.
https://docs.dataaccess.com/dataflexhelp/mergedProjects/DevelopmentGuide/Field_Options.htm
Entry Options Example
I now conclude this lesson with a small example. Here is a straightforward Windows maintenance view for the departments table. In the department_DD a number of settings have been done to accomplish this.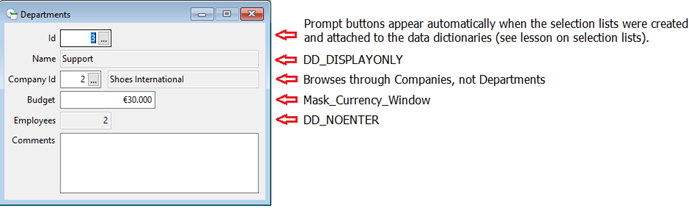
As you can see, there is a prompt button for the DepartmentID. If you would click on it, it would show a list of Departments to select from. The prompt button is shown because a Lookup object has been attached to it. I have not told you how you can create this, but I will do that in the next lesson about selection lists.
Next, Department Name is not accessible and cannot be modified, due to setting the DisplayOnly option to True. CompanyID also has a prompt button. It will show a list of Companies, not Departments, because Entry_Item is linked to Company.Id, not Department.CompanyID.
Then, there is a mask for Budget. Mask_Currency_Window is used, which will apply the local currency symbol, which is the Euro sign in this case. Finally, Employees is not accessible because the NoEnter option is set to True, which is desired because it is a calculated value and should not be edited by the end user.
Note that this is a Windows view. In a web view, things look a bit different, but it mostly functions the same way. So here is another example, a web view this time.
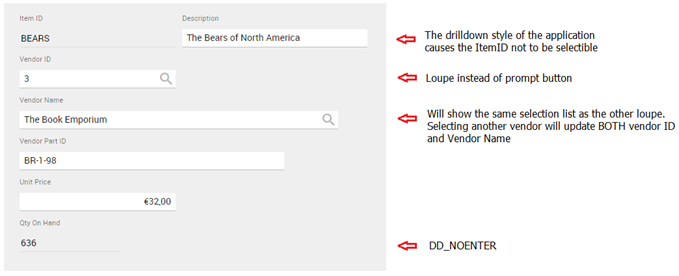
One of the things that is different, is that the ItemID is not selectable, although the Data Dictionary entry options are the same. The reason is that we have a drilldown style application here, which means we came here by clicking from a list of Product Items. The ItemID is not selectable here, I already have selected the item.
In the web view, the prompt for a selection list now shows as a loupe or magnifying glass. But the entry options all just work the same. So, most of the Data Dictionary functionality works the same way for both Windows and Web applications.
In the next lesson we’ll look into selection lists, which is one of the things that is a little different in Windows and Web.
